The abbreviated guide to WebGL
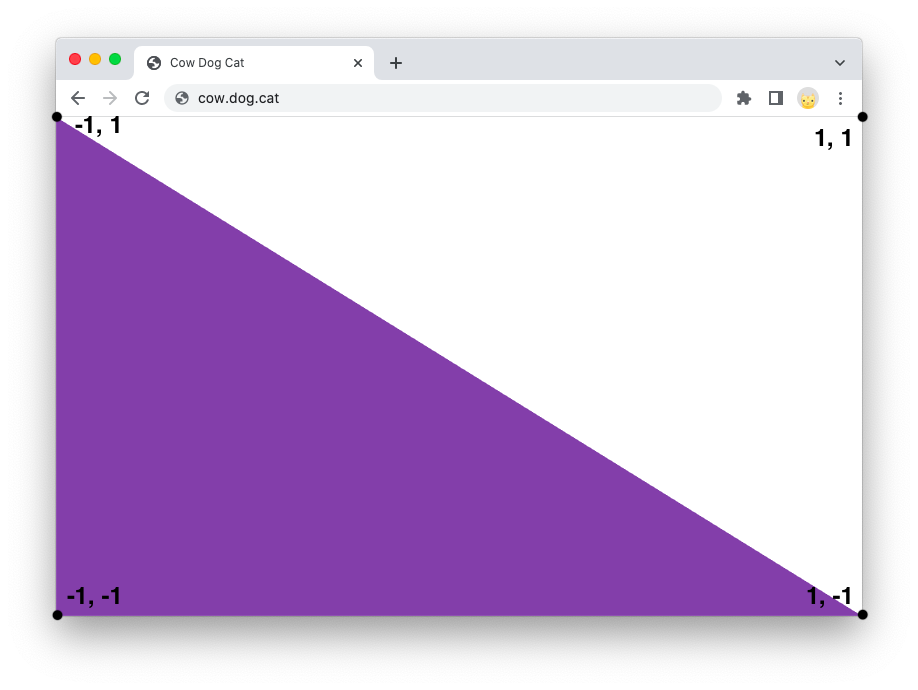
This is a triangle.

It lives in a viewport.

The viewport has a coordinate system named clip space.
You write a program, called a vertex shader, to convert your crazy coordinate system (called view space) into clip space.

But wait! Where did the color come from?
![]()
The color came from another program: a pixel shader. In OpenGL these are called fragment shaders. Some people will tell you fragments are not pixels. These people are correct, but they are nerds and we will ignore them.

So, to recap, you start the pipeline by providing your vertices in a meretricious coordinate system. Your vertex shader then runs on every vertex, transforming it into the clip space coordinate system. Finally, your fragment shader runs on every pixel (no, you shut up) inside the shape and outputs the color for each.
Because the OpenGL authors love pranks, they call this entire pipeline a “program”.

Great! But how did you pass your view space coordinates to the program in the first place? Well, it’s simple. You created a buffer and uploaded them.
const vertices = gl.createBuffer();
gl.bindBuffer(gl.ARRAY_BUFFER, vertices);
gl.bufferData(
    gl.ARRAY_BUFFER,
    new Float32Array([
      // Safe and sane coordinates keep vertices on screen!
      -1, -1,
      -1, 1,
      1, -1,
    ]));
Then you compiled the vertex and fragment shaders and linked them into one big program.
const vertex = gl.createShader(gl.VERTEX_SHADER);
gl.shaderSource(vertex, `#version 300 es
in highp vec2 position;
void main() {
// Our view space coordinate system is clip space! So
// we just copy.
gl_Position = vec4(position, 0, 1);
}
`);
gl.compileShader(vertex);
const fragment = gl.createShader(gl.FRAGMENT_SHADER);
gl.shaderSource(fragment, `#version 300 es
out mediump vec4 fragColor;
void main() {
// The fragment shader is called for every pixel
// inside the triangle. So we always output royal
// purple.
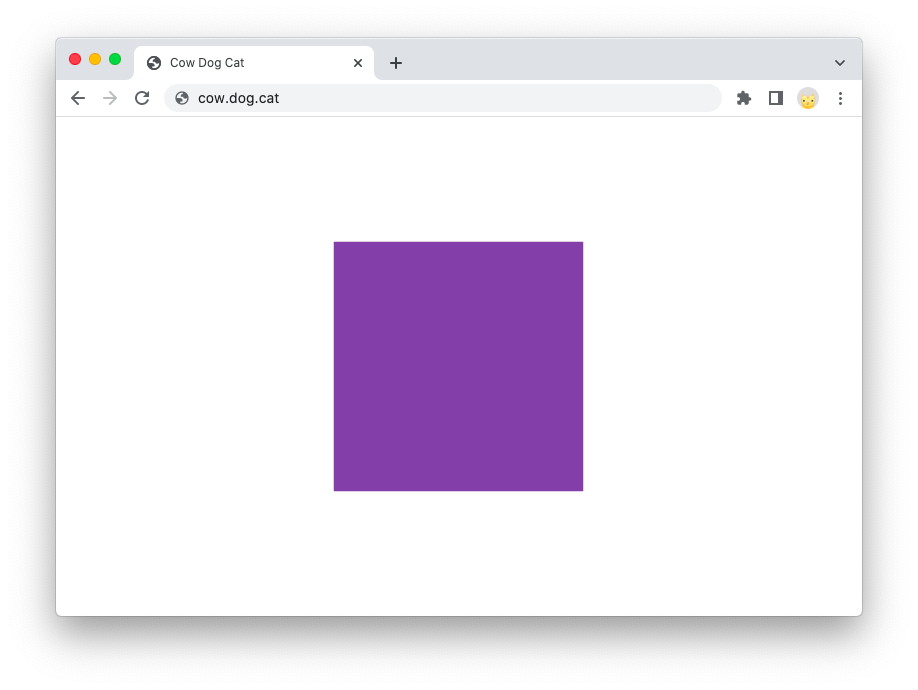
fragColor = vec4(0.47, 0.32, 0.66, 1); // #7a51a9ff
}
`);
gl.compileShader(fragment);
const program = gl.createProgram();
gl.attachShader(program, vertex);
gl.attachShader(program, fragment);
gl.linkProgram(program);
And finally you drew.
gl.useProgram(program);

// Tell OpenGL to pass data from your `vertices` buffer
// to the `position` input.
const position = gl.getAttribLocation(program, 'position');
gl.enableVertexAttribArray(position);
gl.bindBuffer(gl.ARRAY_BUFFER, vertices);
gl.vertexAttribPointer(
    position,
    /* dimensions= */ 2,
    gl.FLOAT,
    /* chaos reigns= */ false,
    /* ignore these */ 0, 0);

gl.drawArrays(
    gl.TRIANGLES,
    /* offset into buffer= */ 0,
    /* vertex count= */ 3);
With a few additional tweaks learned from the dark arts (I’m looking at you, glViewport), everything works swimmingly.
Now I hear you say, “this is a mighty fine triangle. But don’t most people use OpenGL in 3D?” Those people are ner… okay, fine. More dimensions for the dimensions god. Let’s make a cube.
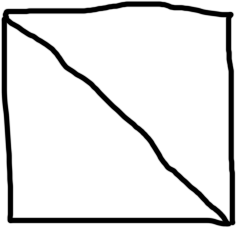
To make a cube, you must first make a square out of two triangles.
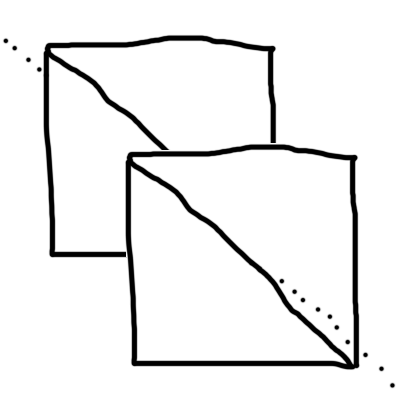
Then you duplicate the square and push the duplicate backwards along the z coordinate. Now you have a front face and a back face.
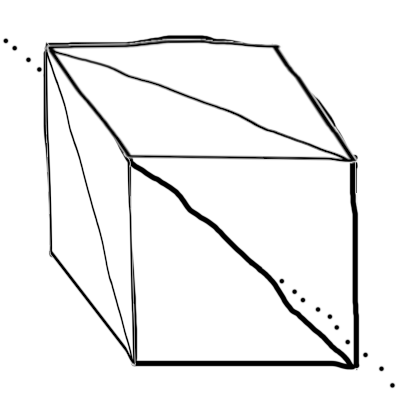
And finally you add squares on the left, right, top, and bottom.
Now you update your vertex data, including a third component on every vertex representing z.
gl.bufferData(gl.ARRAY_BUFFER, new Float32Array([
  // the original triangle front face
  -1, -1, 1,
  -1,  1, 1,
   1, -1, 1,
  // the other triangle on the front face
  -1,  1, 1,
   1, -1, 1,
   1,  1, 1,

  // the back face
  -1, -1, -1,
  -1,  1, -1,
   1, -1, -1,
  -1,  1, -1,
   1, -1, -1,
   1,  1, -1,

  // left face
  -1, -1,  1,
  -1, -1, -1,
  -1,  1, -1,
  -1,  1, -1,
  -1,  1,  1,
  -1, -1,  1,

  // ... snipped ...
]));
Modify your vertex shader to expect z in its vertex input.
in highp vec3 position;

void main() {
  // Divide by the coordinates by 2 so the cube doesn't
  // take up the entire screen.
  gl_Position = vec4(position / 2., 1);
}
And tell OpenGL to draw 6 faces with 3 components (x, y, and z) per vertex.
gl.vertexAttribPointer(
    position,
    /* dimensions= */ 3,
    gl.FLOAT,
    /* chaos reigns= */ false,
    /* ignore these */ 0, 0);

gl.drawArrays(
    gl.TRIANGLES,
    /* offset into buffer= */ 0,
    6 /* faces */ * 6 /* vertices per face */);
Behold, a cube! (I’ve fixed the aspect ratio with gl.viewport in the rest of this article.)
Oops, a cube rendered head-on is indistinguishable from a square. Let’s animate it by rotating around the y axis.
You could modify your vertex data and reupload it every frame, but that would be slow. Instead, you want the vertex shader to uniformly rotate every vertex by a constant (the angle around the y axis.) These constants are called uniforms in OpenGL.
gl.shaderSource(vertex, `#version 300 es

// The same angle is used for every vertex, because we want to
// rotate the cube uniformly.
uniform highp float angleAroundY;

in highp vec3 position;

void main() {
  // Mindlessly copying R_y from Wikipedia's "Rotation matrix"
  // page
  mat3 rotation = mat3(
      cos(angleAroundY), 0, -sin(angleAroundY),
      0, 1, 0,
      sin(angleAroundY), 0, cos(angleAroundY)
  );

  gl_Position = vec4(rotation * position / 2., 1);
}
`);

// ... snip ...

const angleAroundY = gl.getUniformLocation(program, 'angleAroundY');

let angle = 0;
const draw = () => {
  // Clear the screen every draw so we don't see previous frames
  gl.clear(gl.COLOR_BUFFER_BIT);

  // Upload the angle
  gl.uniform1f(angleAroundY, angle);

  // Draw!
  gl.drawArrays(gl.TRIANGLES, 0, 6 * 6);

  // Increment the angle for the next frame
  angle += 0.01;

  // Request the next frame.
  requestAnimationFrame(() => {
    draw();
  });
};
draw();
Surely now it will work.
… maybe? The cube is a single color. Let’s instead use the vertex positions as the colors by passing them to the fragment shader.
gl.shaderSource(vertex, `#version 300 es

uniform highp float angleAroundY;

in highp vec3 position;
out mediump vec3 fragPosition;

void main() {
  mat3 rotation = mat3(
      cos(angleAroundY), 0, -sin(angleAroundY),
      0, 1, 0,
      sin(angleAroundY), 0, cos(angleAroundY)
  );

  fragPosition = position;
  gl_Position = vec4(rotation * position / 2., 1);
}
`);

// ... snip ...

gl.shaderSource(fragment, `#version 300 es

in mediump vec3 fragPosition;
out mediump vec4 fragColor;

void main() {
  // The vertex positions are in the range of [-1, 1], but
  // colors range from [0, 1]. So rescale them.
  fragColor = vec4(fragPosition / 2. + 0.5, 1);
}
`);
And now it will work perfectly. Note that OpenGL interpolates the fragPosition vector automatically for us, generating a rainbow of color between vertices.
Yikes, it still doesn’t work right. Why does the direction of rotation alternate? It turns out that faces in the back are being drawn on top of faces in the front. Let’s tell OpenGL to check if it’s rendering a fragment on top of another fragment that it should be behind.
gl.enable(gl.DEPTH_TEST);

let angle = 0;
const draw = () => {
  gl.clear(gl.COLOR_BUFFER_BIT | gl.DEPTH_BUFFER_BIT);

// ... snip ...
And finally, we get our gorgeous cube.
At this point, you know almost all there is to know. Painting with an absurdly broad brush, what separates you from an expert is an understanding of how to push shaders to the limit, performance optimizations (like triangle strips and vertex array objects), and knowledge of niche features like framebuffers and the stencil buffer.
As a taste of what remains, let’s take a brief dive into lighting. Lighting in OpenGL boils down to darkening unlit pixels. As an OpenGL professional, you know that when you need to change the color of a pixel you do it with the fragment shader.
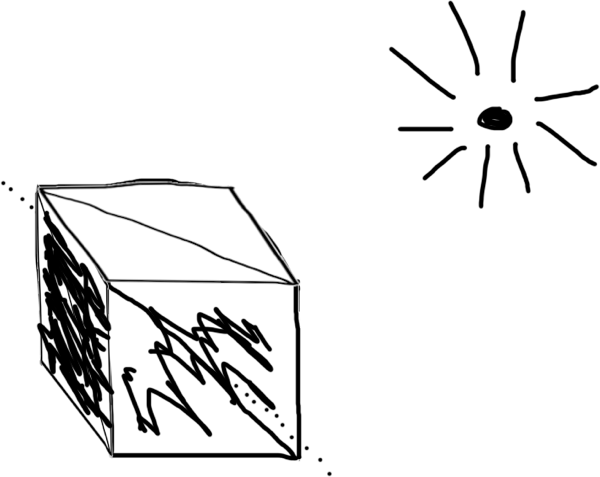
We’ll determine how lit each face is by considering the agreement between the vertex normal and the direction towards the spot light. It’s easiest to understand this in 2D.

Simple! So go ahead and add the normal information to your vertices.
gl.bufferData(gl.ARRAY_BUFFER, new Float32Array([
  // the front faces towards <0, 0, 1>
  -1, -1, 1, 0, 0, 1,
  -1,  1, 1, 0, 0, 1,
   1, -1, 1, 0, 0, 1,
  -1,  1, 1, 0, 0, 1,
   1, -1, 1, 0, 0, 1,
   1,  1, 1, 0, 0, 1,

  // the back faces towards <0, 0, -1>
  -1, -1, -1, 0, 0, -1,
  -1,  1, -1, 0, 0, -1,
   1, -1, -1, 0, 0, -1,
  -1,  1, -1, 0, 0, -1,
   1, -1, -1, 0, 0, -1,
   1,  1, -1, 0, 0, -1,

   // ... snip ...
Then tell the vertex shader to expect a normal input and pass it through to the fragment shader.
gl.shaderSource(vertex, `#version 300 es

uniform highp float angleAroundY;

in highp vec3 position;
in highp vec3 normal;
out mediump vec3 fragPosition;
out mediump vec3 fragNormal;

void main() {
  mat3 rotation = mat3(
      cos(angleAroundY), 0, -sin(angleAroundY),
      0, 1, 0,
      sin(angleAroundY), 0, cos(angleAroundY)
  );

  // Unlike before, we tell the fragment shader the actual
  // position of the vertex so it can calculate lighting
  // information.
  fragPosition = rotation * position / 2.;
  fragNormal = rotation * normal;
  gl_Position = vec4(fragPosition, 1);
}
`);
And update the fragment shader to calculate the agreement between the normal and the direction towards the light.
gl.shaderSource(fragment, `#version 300 es

in mediump vec3 fragPosition;
in mediump vec3 fragNormal;
out mediump vec4 fragColor;

void main() {
  mediump vec3 lightPosition = vec3(10, 0, -10);
  mediump vec3 dl = lightPosition - fragPosition;
  mediump float magnitude =
      dl.x * dl.x + dl.y * dl.y + dl.z * dl.z;
  mediump vec3 dlUnit = dl * inversesqrt(magnitude);
  mediump float agreement = dot(fragNormal, dlUnit);

  fragColor = vec4(agreement * vec3(0.47, 0.32, 0.66), 1);
}
`);
Finally, tell OpenGL where you put your normals.
const position = gl.getAttribLocation(program, 'position');
gl.enableVertexAttribArray(position);
gl.vertexAttribPointer(
    position,
    /* dimensions= */ 3,
    gl.FLOAT,
    /* chaos reigns= */ false,
    /* bytes between successive vertices= */ 6 * 4,
    /* byte offset of first position= */ 0);
const normal = gl.getAttribLocation(program, 'normal');
gl.enableVertexAttribArray(normal);
gl.vertexAttribPointer(
    normal,
    /* dimensions= */ 3,
    gl.FLOAT,
    /* chaos reigns= */ false,
    /* bytes between successive vertices= */ 6 * 4,
    /* byte offset of first position= */ 3 * 4);
And there shall be light!